Exception Calendar and Meeting Planner
WFO Live features a built-in exception calendar planner to help managers determine when employees are unavailable due to vacation, off days, or other exceptions. The exception calendar planner is particularly useful in determining whether to accept or deny a request for vacation time based on existing exceptions. The exception planner includes a meeting planner to allow managers to schedule individual and group meetings with agents. WFO Live schedules the meetings at times that will have the least impact on contact center operations.
What do you want to do?
Tasks in this Topic Include:
- Use the Exception Calendar
- Exception Conflict Resolution
- Use the Meeting Planner
- Set Group Meeting Style
- Set Individual Meeting Style
- Use Meeting Chooser
- Use Meeting Editor
Related Tasks:
- Set Open / Close Days
- Setting Up Hours of Operation
- Employee Templates
- Employee List
- Maintain Inactive Employees
- Generate Rosters
- Rosters - Inbound Calls
- Reports
- Employee Reports
- Charts
- Exception Management
- Set Exception Codes
Use the Exception Calendar
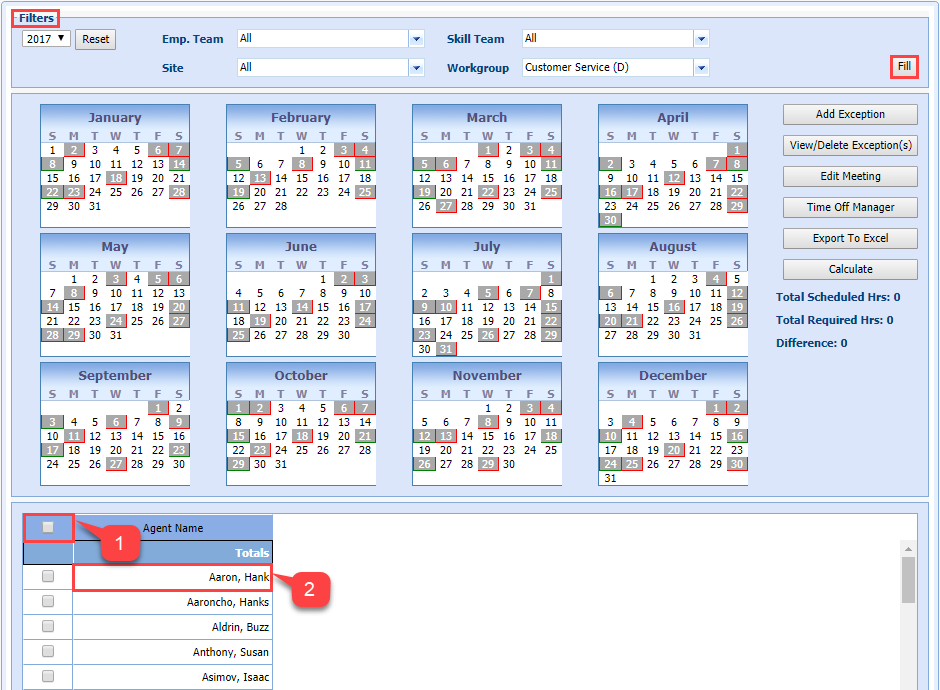
- Select Exception Calendar from the Manage left-navigation menu.
- Select the filters as required:
- Select the year from the drop-down menu.
- Select the Employees Team from the Emp. Team drop-down menu.
- Select the Skill Team.
- Select the site from the Site drop-down menu.
- Select the workgroup from the Workgroup drop-down menu.
- Select Fill to populate the calendars with current exceptions for the filters selected.
- Select the dates the exception applies to in the calendar section.
- Select the Agent Name check boxes of all agents to apply an exception to.
- Select Add Exception.
- Select the exception Type
in the drop-down menu.
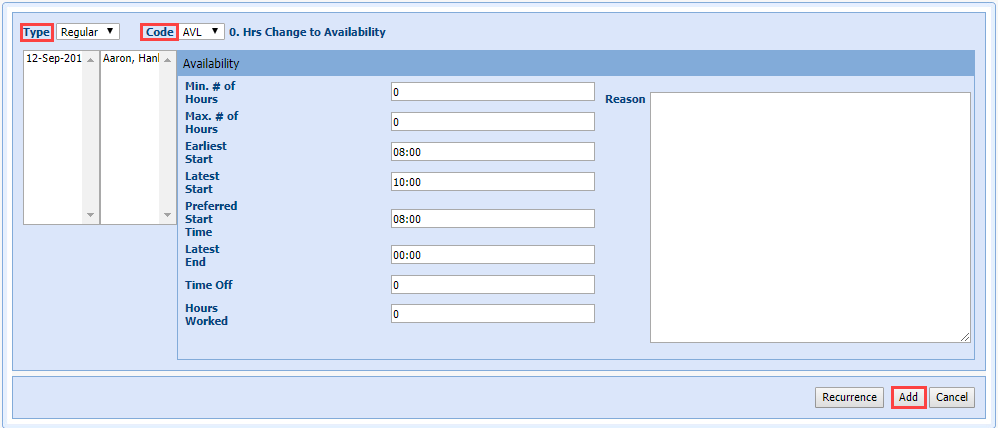
- Select the Code from the drop-down menu.
- Select Add.
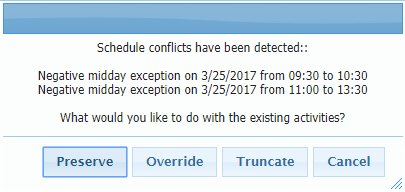
Exception Conflict Resolution
When an exception conflicts with another scheduled activity, the existing activity can be overridden, moved, truncated, or preserved. Preserve allows administrators to enter a full day's schedule of mid-day exceptions, and have Monet automatically create exceptions around the other existing activities like Breaks, lunch, non-call, and other exceptions.
Before the Roster is Generated:
Preserve becomes an option before the schedule is generated if:
- The user inputs a new mid-day exception that conflicts with an existing mid-day exception.
- The new exception must conflict and be greater than either the start or end time of the existing exception, or both.
After the Roster is Generated:
Preserve becomes available if there are any conflicts with existing activities other than "Available" time:
- Breaks
- Lunch
- Non-call
- Mid-day negative or neutral exceptions
Overlap:
The new exception only occupies the space before or after the existing exception. If there is a Full-Overlap that Exceeds Both Start and End Times of an Existing Exception, two new exceptions are created to fill in the space around the existing exception; and the existing exception is left intact.
Personal Hours and Time Off Hours Handling:
If the new exception contains Personal Hours or Time Off hours, the value for the exception being entered is split proportionally across the new exceptions being created.
Break and Lunch:
Move/Move Always/Override break and lunch handling is taken from the exception as it is created.
The conflict resolution dialogue is only shown when a break or lunch will be overridden, regardless of the Move/Move Always/Override user selection. When this dialog is received, Preserve is an option. If the break or lunch can be moved with the Move/Move Always selection, the dialogue is not shown.
The dialog is always brought up if Override is selected, and an existing activity will be deleted.
The Preserve option will always display except in one case:
The exception does not exceed either the start nor the end of the existing activity (multiple if the existing activities are adjacent).
If neither the start nor end time of the new exception goes beyond the start or end time of the existing activities, then the Preserve option is not displayed.
When the user selects Override, the conflict dialogue is brought up. The user selects Preserve, then the breaks and lunch are kept in place.
If an exception conflicts with other scheduled activities, the exception entry conflict dialog displays showing where conflicts were detected. Choose to Preserve the existing activities, Override, Truncate, or Cancel the exception addition.
Plan a Meeting
In office environments, you often need to plan meetings based on the participants availability, and calendar applications typically provide features to assist you. Typically these meeting planners locate and suggest times when all or most participants have no other meeting or activity listed.
In the contact center, you must further consider the need to have employees to answer incoming calls. Thus, we must find the time when the most participants are available and when the absence of those participants will have the least impact on the service levels of the contact center.
WFO Live has a built-in meeting planner in order to allow you to find optimal times to schedule meetings with employees, and to add those meetings as exceptions. This meeting planner includes the ability to schedule a single meeting (Group Meeting), as well as multiple individual meetings, out of a larger selection of participants.
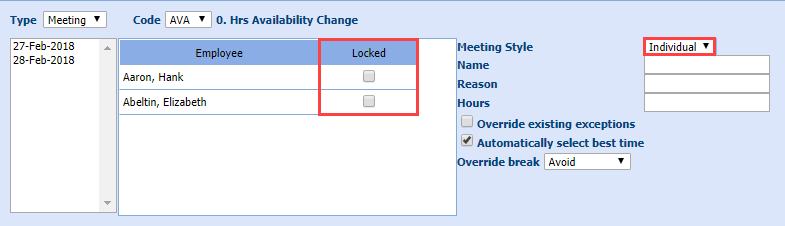
The Individual Meetings option allows any participant (e.g., a manager) to be locked. Locked participants are included in all scheduled meetings. Managers can use this for 1-on-1 meetings with their agents.
Create a Meeting Exception
- Select Exception Calendar from the Manage left-navigation menu.
- Select the dates for the meeting in the calendar section.
- Select all the Agent Name check boxes of the agents who will attend the meeting.
Set Meeting Style as Group
If the meeting style is Group, the Lock Column disappears.
The Group meeting style schedules all selected agents into a single meeting.
To set a group meeting style:
- Select Group
from the drop-down menu.
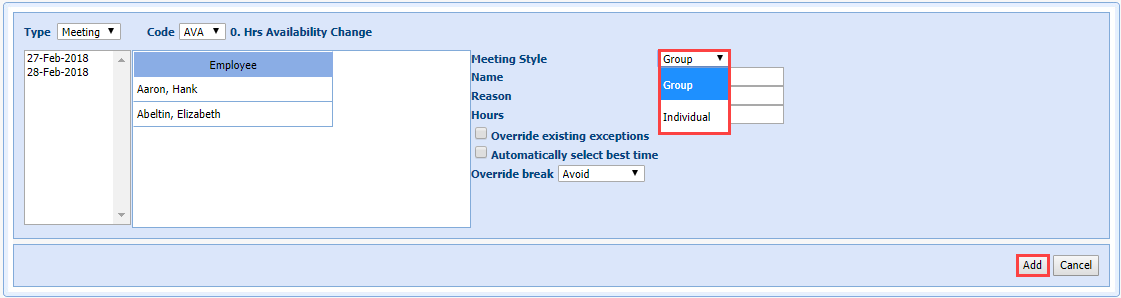
- Enter Name.
- Enter Reason.
- Enter Hours.
- Select the Override existing exceptions check box (optional).
- Select the Automatically select best time check box (optional).
- Select the Override break (optional).
- Select Add.
Example: Multiple agents meeting with supervisor
Supervisor Buzz Aldrin wants to find an optimal time to meet with a group of agents for 30 minutes to discuss a new process being rolled out next month. The supervisor selects everyone on his team that works a similar time of day, and allows Monet to present some possibilities.
- Select Manage
> Exception Calendar in the left-navigation
menu.

- Select the check boxes of the agents and supervisors needed for the meeting in the Agent Name table.
- Select the possible meeting dates from the Calendar picker.
- Select Add Exception.
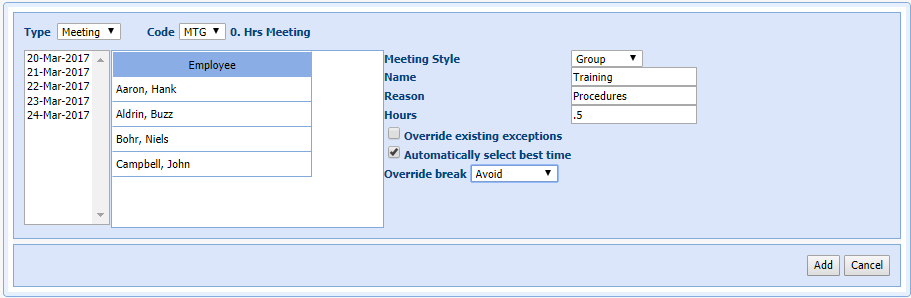
- Select Meeting in the Type drop-down menu.
- Select the appropriate code for Meetings (MTG) in the Code drop-down menu.
- Select the Meeting Style (Group).
- Enter a Nameand Reason.
- Enter .5 in Hours.
- Select the check box for Automatically select best time.
- Leave Override break set to the default of Avoid.
- Select Add to place the meeting.
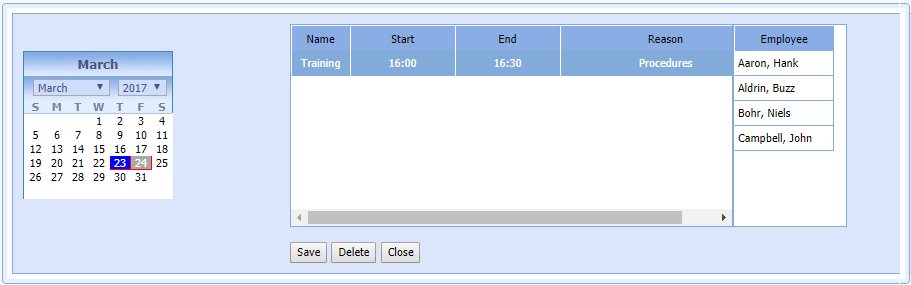
- Wait
until the system returns results for selecting the best time. You
can check to see if all the requested agents will be able to attend.


- Select Meeting
in the Type drop-down menu.
- Select the appropriate Code from the drop-down menu.
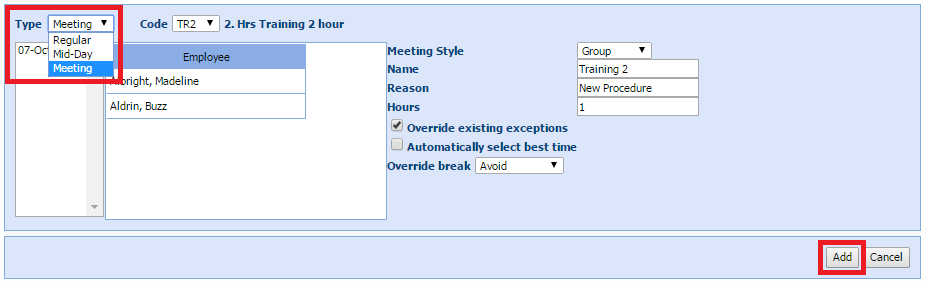
Set Meeting Style as Individual
If you set the Meeting Style drop-down menu to Individual, WFO Live will create individual meetings. By default, WFO Live creates exactly one meeting for each employee listed. However, if any employee is locked, then that employee will be included in every meeting. Managers can use this for 1-on-1 meetings with their agents.
The system checks the Automatically select best time option by default. The system will look for the best suitable time for the meeting and automatically add the meeting. The system will drop the employees from the meeting if it’s unable to find a suitable time, and displays a message with the employee names it is unable to add a meeting.
To create an individual meeting:
Select Individual
from the Meeting Style drop-down
menu.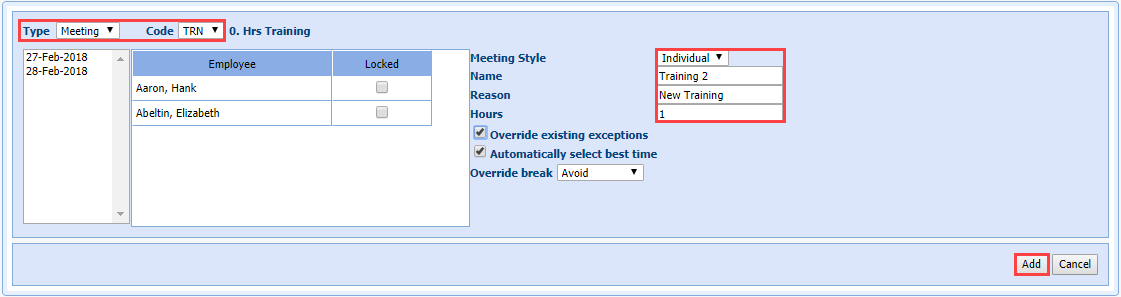
- Enter a Name for the meeting.
- Enter a Reason for the meeting.
- Enter the length of the meeting in Hours e.g., 0.5 for a 30-minute meeting, 1.0 for a 60-minute meeting).
- Select Override existing exceptions as desired.
- Uncheck the Automatically select best time as desired (see above.)
- Select the Override break setting in the drop-down menu as desired (Avoid, Move, Move Always).
- Select Add.
Use Meeting Chooser
The system displays meeting details in the Meeting Chooser grid. You can highlight an entry and see the participants availability, as well as the surplus/shortage values for the whole time throughout the meeting.
- Select a row in the Meeting
Chooser, and then click Select.

The top grid displays the lists of all meeting groups. Data displayed would be based on the date selection from the calendar. It displays the start and end time of the meeting. The lower grid displays all the employees from the selected meeting in the Meetings grid. You can edit or delete the selected meeting using the options in the Use the Meeting Editor section.

- Select on one of the following:
- Select Yes to Accept the meeting.
- Select No to cancel the meeting.
The +/- Before and +/- After columns indicate the agent availability before and after choosing a particular meeting time. In the example above, the first meeting choice (Start of 11:45) has 3.0 surplus agents available to answer calls before the meeting option is selected, and 2 surplus agents available after the meeting choice is selected.
The possible meeting times are displayed in order from best to worst agent availability.
The Period Balances table displays the average surplus of agents for all intervals within the time span of the meeting.
Use the Meeting Editor
The Meeting Editor allows you to edit or delete the meetings.
Edit a Meeting:
- Select Edit
Meeting from the Exception Calendar.

- Select a meeting date from the Calendar display.
- Double-click, and enter Start Time.
- Double-click, and enter End Time.
- Select Apply.